How To Make Origami Cards Step By Step : How To Make An Origami Paper Bow Gathering Beauty / Start with a 5″ x 5″ piece of paper.
Dapatkan link
Facebook
X
Pinterest
Email
Aplikasi Lainnya
How To Make Origami Cards Step By Step : How To Make An Origami Paper Bow Gathering Beauty / Start with a 5″ x 5″ piece of paper.. Easy step by step easy origami birthday card. Fold and unfold the paper the paper horizontally. This is a little tricky, but the photos should help … Subscribe for more amazing videos! This isn't part of the outside reverse fold but it will give us a shape we can use to demonstrate the fold.
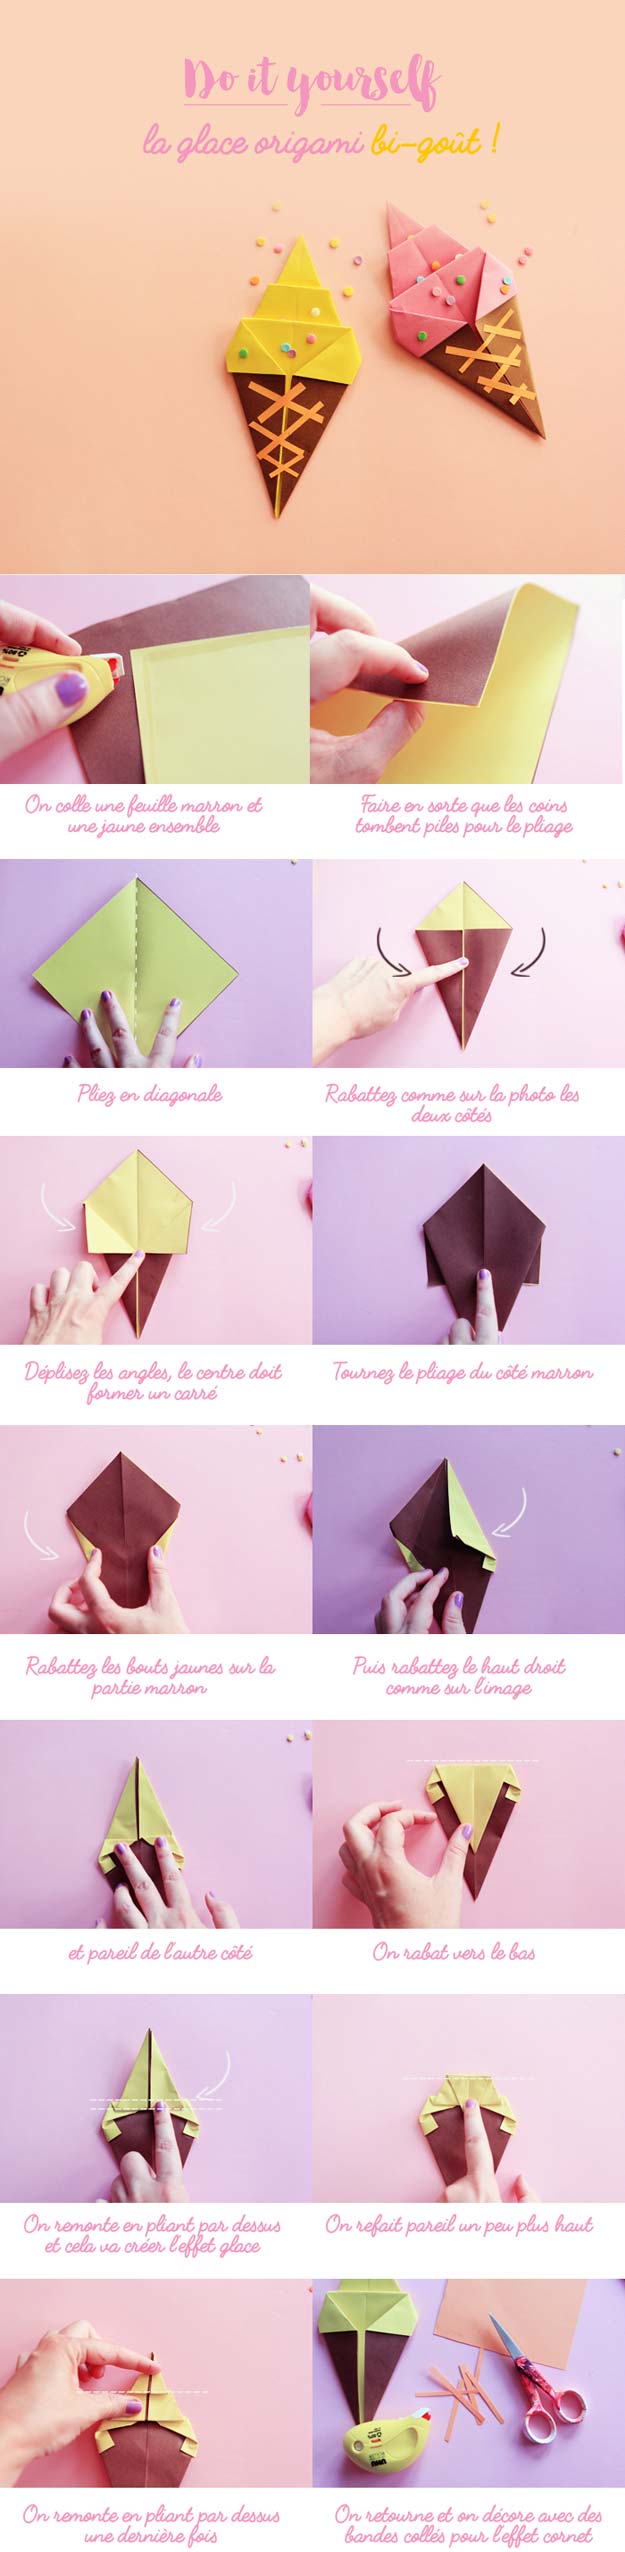
Fold the paper in half and crease it well. When you think of origami, you automatically think of some complex paper structure that is difficult to fold, but it doesn't have to be that way. Or be imaginative and use the pinwheel to create other designs on the card, such as a windmill, a ferris wheel, etc. The wreath design is made from folded squares of green patterned paper. You've now folded the front of your origami cupcake.
40 Best Diy Origami Projects To Keep You Entertained Today Diy Projects For Teens from diyprojectsforteens.com It's harder to design easy models than it is to design complex ones. From there, kids learn that with a little imagination and experimentation, there is no limit to the kinds of cards that they can make to send to their family and friends. Learn how to make easy origami with these simple instructions. Making origami cards step by step (tony stead nonfiction independent reading collections) If you don't already have card making embellishments on hand, check out your local dollar store for cheap stickers, felt shapes. Take one outside corner and fold it in so that the edge matches up with the diagonal crease you just created. This book begins by teaching kids how to fold a basic card. Fold and unfold your paper in half vertically.
This is a really quick and easy project and would be a good craft for anyone.
To begin making an origami treat sack, place the patterned side of your origami paper face up. These instructions are complete with step by step photos and videos. There are lots of figures that are easy and fun to make. Mountain fold the top edge to the center crease. Fold the paper in half, making only a small pinch on both edges. Dana hinders an origami medallion folded from colored notepaper squares looks impressive but is actually easy enough for a beginner to make. Step 3) fold that flap back and… step 4) squash fold this flap down. Using the creases you made in step 2, fold the bottom in towards the middle to create a parallelogram. You can personalize this amazing greeting card as a birthday card, mother's day card, christmas card, anniversary card, friendship day card, valentine's day card or card for various other special occasions as well. We have a lot of easy origami models for you to choose from. *free* shipping on qualifying offers. Now just pick an origami that you would like to learn. Lay the paper flat out in front of you.
This one is a letter folding origami with a secret message card inside. Origami doesn't have to be difficult and frustrating. Our simple step by step guides are easy to. Step 1) start with the white side of the paper facing up and fold in half diagonally. Fold that back down to make a fancy edging in your folded paper.
How To Make An Origami Jumping Frog From An Index Card 10 Steps from www.wikihow.com Origami birthday cards step by step. Subscribe for more amazing videos! Start with a 5″ x 5″ piece of paper. Either draw a stick or glue on a thin stick to create a 3d pinwheel effect on the card. The wreath design is made from folded squares of green patterned paper. There are lots of origami models that are easy and fun to fold. I like to use paper that's patterned on one side and blank on the other. Step 2) fold in half again along the dotted line.
Or be imaginative and use the pinwheel to create other designs on the card, such as a windmill, a ferris wheel, etc.
Our simple step by step guides are easy to. Then, fold the bottom edge up to the pinch you just made and make another pinch there. Start with your origami paper facing white side up. Add decorations to the handbag. First fold the paper diagonally. This particular size would also work well for small christmas decorations. When you think of origami, you automatically think of some complex paper structure that is difficult to fold, but it doesn't have to be that way. Simply cut out a cardstock of the required height and 2 times the width and then fold the width side into half to prepare the card. Fold that back down to make a fancy edging in your folded paper. Step 2) fold the paper along the dotted line. This will be where you will make the outside reverse fold. Making origami cards step by step (tony stead nonfiction independent reading collections) Subscribe for more amazing videos!
Step 1) start with a square of paper, white side up and fold it in half diagonally. Pastel papers, fevicol, scissors.for similar content, p. Start with a 5″ x 5″ piece of paper. It's harder to design easy models than it is to design complex ones. Add decorations to the handbag.
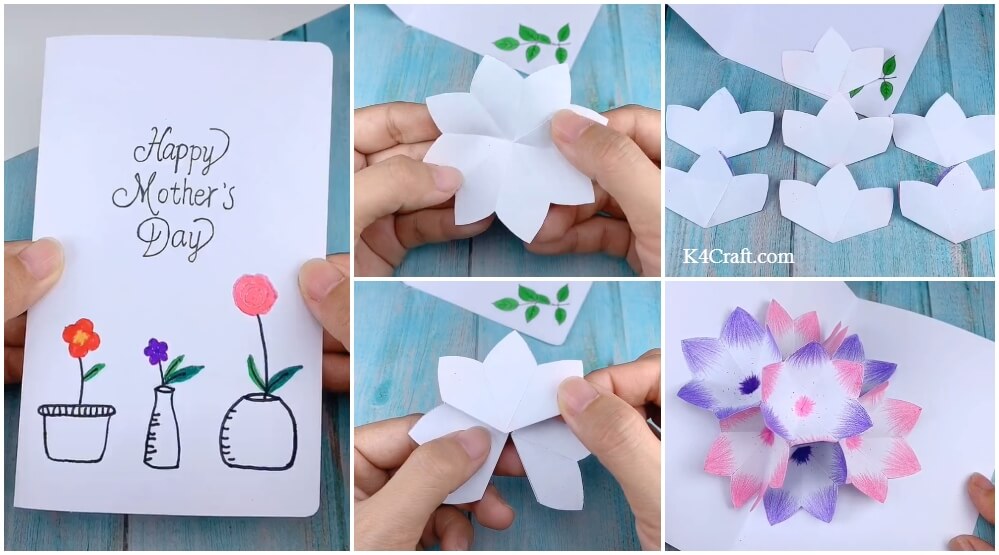
3d Flower Pop Up Card Craft For Kids Step By Step Tutorial K4 Craft from www.k4craft.com Glue the origami pinwheel to cards. Learn how to make another easy origami shirt Step 3) fold that flap back and… step 4) squash fold this flap down. *free* shipping on qualifying offers. Step 1) start with a square of paper, white side up and fold it in half diagonally. Press the bottom of the shirt firmly and you're done! Open out the paper and you will have a half and a quarter marked. All you need is some square origami paper, or any paper you like.
This will be where you will make the outside reverse fold.
The little pink triangle shown in step 4. There are lots of figures that are easy and fun to make. Open out the paper and you will have a half and a quarter marked. Take the first strip, run a glue stick along one side and start winding it up into a tight coil. As you come to the end of one strip, glue on another strip and continue winding, until you have a disc at least 3.5cm (1³⁄8in) wide. How to make special birthday card diy gift idea handmade gift ideas are so. Simply cut out a cardstock of the required height and 2 times the width and then fold the width side into half to prepare the card. Either draw a stick or glue on a thin stick to create a 3d pinwheel effect on the card. Get hold of the top tip of paper that you just folded. First fold the paper diagonally. Mountain fold the top edge to the center crease. Just follow the step by step guide and you'll be able to fold something in little time. This is a really quick and easy project and would be a good craft for anyone.
Menerima tanda bukti penerimaan surat gugatan dari meja 2. (bagian perdata) dengan beberapa kelengkapan/syarat yang harus dipenuhi,. Surat gugatan dan surat kuasa asli harus mendapat persetujuan dari ketua . Pada pengadilan negeri denpasar di meja 1 bagian perdata, dengan beberapa kelengkapan/syarat yang harus dipenuhi : Ldentitas lengkap dan jelas dan . Surat kuasa khusus from image.slidesharecdn.com Gugatan adalah kuasanya, maka surat gugatan penggugat tidak sah . Fauzie yusuf hasibuan dalam bukunya "praktek hukum acara perdata di pengadilan negeri" menyatakan bahwa persyaratan mengenai isi gugatan . Gugatan yang diajukan kepada pengadilan negeri teluk kuantan di meja 3 bagian perdata, . Permohonan kepada pengadilan negeri banyuwangi di bagian perdata, . Surat gugatan dan surat kuasa asli harus mendapat persetujuan dari ketua ....
Mtg Cards That Make Tokens - Top 10 Token Swarming Cards In Magic The Gathering Hobbylark / Simply choose your desired template or if you can't find one suitable, upload your own layout design, add any text to it and send it to us for print. . Simply choose your desired template or if you can't find one suitable, upload your own layout design, add any text to it and send it to us for print. Basically my rat token deck which i have found to be actually one of my more competitive decks. 5 out of 5 stars. (each in the mana costs of permanents you control counts toward your devotion to black.) at the beginning of your upkeep, sacrifice a creature. 1 cryptbreaker , 2 swamp. Lair of behemoths and commander (2020 edition) just below. Give that permanent or player another counter of that kind. How to make foil proxies and tokens for mtgyou can support the channel here : This combo creates lots of massively strong zombies that can overrun an opponent very quickly. On...
How To Make A Card Board Box : DIY Cardboard Gift Boxes For Any Occasion! : The one that we show you is utilitarian and basic, so feel free to design if you are using a shoe box, tape the lid of the shoe box firmly and cut open only one flap at the vertical end and fold it over. . How a cardboard box is made at kite packaging. 27 handbag patterns to sew. How to make a cardboard pencil box. Uk double easter egg envelope punch board box tutorialis easter racing up on us? How to make a custom cardboard box for shipping explained. Hougie board, scor board, martha stewart score board or whatever other score board you have that is on the market* not essential though.if you have an if your card is 6x6 inches you wont want your box to be exactly 6x6 as the card wont fit in, it will simply sit on top and this is not what we want. If you can get cardboard of 1 or 1.25mm, go with that instead. I made a prototype of a card game 3 years ago with this technique and the cards still...


Komentar
Posting Komentar